On this page I will try to show the process that is involved to take a piece of tree and prepare it for the lathe, then how I work the piece and finish the end product.
First some tree limbs or trunks have to be collected. These images show the size and condition of what is available. The pieces are quite large, and there is no telling what is within the bark. Sometimes we run into rocks, nails, chainsaw chains, barbed wire and so on. My good friend and fellow woodturner, John Taliaferro is seen here as we survey and start to cut into some of our supply of raw material.
Keep in mind that all the trees we work with are already on the ground, and were destined for the landfill.


This sequence of pictures shows how I am able to take a commercially produced bowl blank and load it to the lathe to produce the end result. The blank used is a piece of Zapatero wood that was salvaged from the construction of the Panama Canal. Apparently it is from logs that have been salvaged underwater in the lakes that were formed during the construction of the Canal almost 100 years ago.
 This piece measured 12″ dia. x 2″ thick.
Now I need to reference a center on the blank with the help of a homemade center finder. This is just a thick flexible plastic film with concentric rings drawn on it. The different colours are easier to follow than all one colour.


The piece is mounted on the lathe between the chuck and the tail stock. I tried to use a faceplate to secure the wood, but the wood is so dense, even pre-drilling for screws only ended up with sheared heads of stainless steel screws. You will notice the pink ribbons on the lathe. This is in memory of Connie who continues to drive me to make these pieces.
These next 6 images are of the initial shaping on the outside of the blank. I am looking to make a tenon for the chuck to grip when the piece is turned around so that the inside of the bowl can be shaped.


Here the bowl has been turned over and held with the chuck so the inside can be shaped.


This is the final shape of this shallow bowl as seen on the lathe. Usually we see bowls sitting on a table or some horizontal surface. When turning a bowl my view is tilted 90 degrees and it is sometimes awkward to make the piece so that it looks, feels and functions good in its usual setting.


The next step is to sand the piece. This is the most tedious and time consuming part of the process, but without a very well sanded piece, all the efforts will be lost when a finish is applied. The finish will enhance the natural beauty as well as any defects on the piece. Here I used a drill with some attachment to hold sanding discs up to 800 grit for a uniform smooth look and touch. I also wear a dust mask, the particulate matter is not the best for you to breathe, no matter what the wood. Some of my pieces also require meticulous hand sanding.


The bowl is shaped and sanded, ready to be turned over one more time so that the tenon can be taken care of.


Here the bowl is mounted on a chuck with what are called jumbo jaws. I am able to have complete access to the bottom of the bowl and remove the tenon that served to hold the piece for most of its time on the lathe. 

Finally the bowl is done. I have cut my 3 rings in the bottom, etched my name, variety of wood, and the year and logbook number of this particular bowl. This is now ready for the finish.

The finish I will use is Danish oil, and when it is dried I will load the last pictures. This piece is not available for sale.
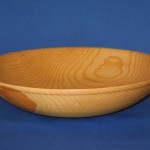
Here is the finished and buffed piece. The finish is Danish oil, then the piece is buffed with tripoli, and waxed with carnauba wax.


I have a video on youtube entitled “Birth of a Bowl“, https://www.youtube.com/watch?v=zmHcfuhhS3M. and it is a quick overview going from log to a finished bowl.
You can also see my instagram page bowlsforbreasts.